Getting started
Welcome to Nageru! For simple use, you can jump right in and make yourself comfortable (at least if you have the hardware requirements in place and have compiled it), but if you prefer a gentler introduction, this is the place.
Introduction to the M/E workflow
Nageru, like most hardware video mixers, is based on the mixer/effects workflow, or just M/E for short. (Don’t ask why “mixer” or “effects”; the name is confusing and mostly historical.)
The basic idea of M/E is that you have two main displays, preview and live. Every time you want to change what’s shown to the viewer, you first bring it up on the preview display, verify that it indeed contains something you’d like to show to your viewers, and only then start a transition to move the preview display onto the live display (which mirrors exactly what the viewers see). After the transition is done, the preview and live displays switch, allowing the operator to either switch back or to pull a new source onto the preview display.
In Nageru, the available transitions at any time are governed by the theme. However, generally a simple cut (moving immediately from live to preview) will nearly always be an option. Other effects include fades and zooms, but availability will depend on what sources are involved in the transition.
A brief tour of the Nageru UI
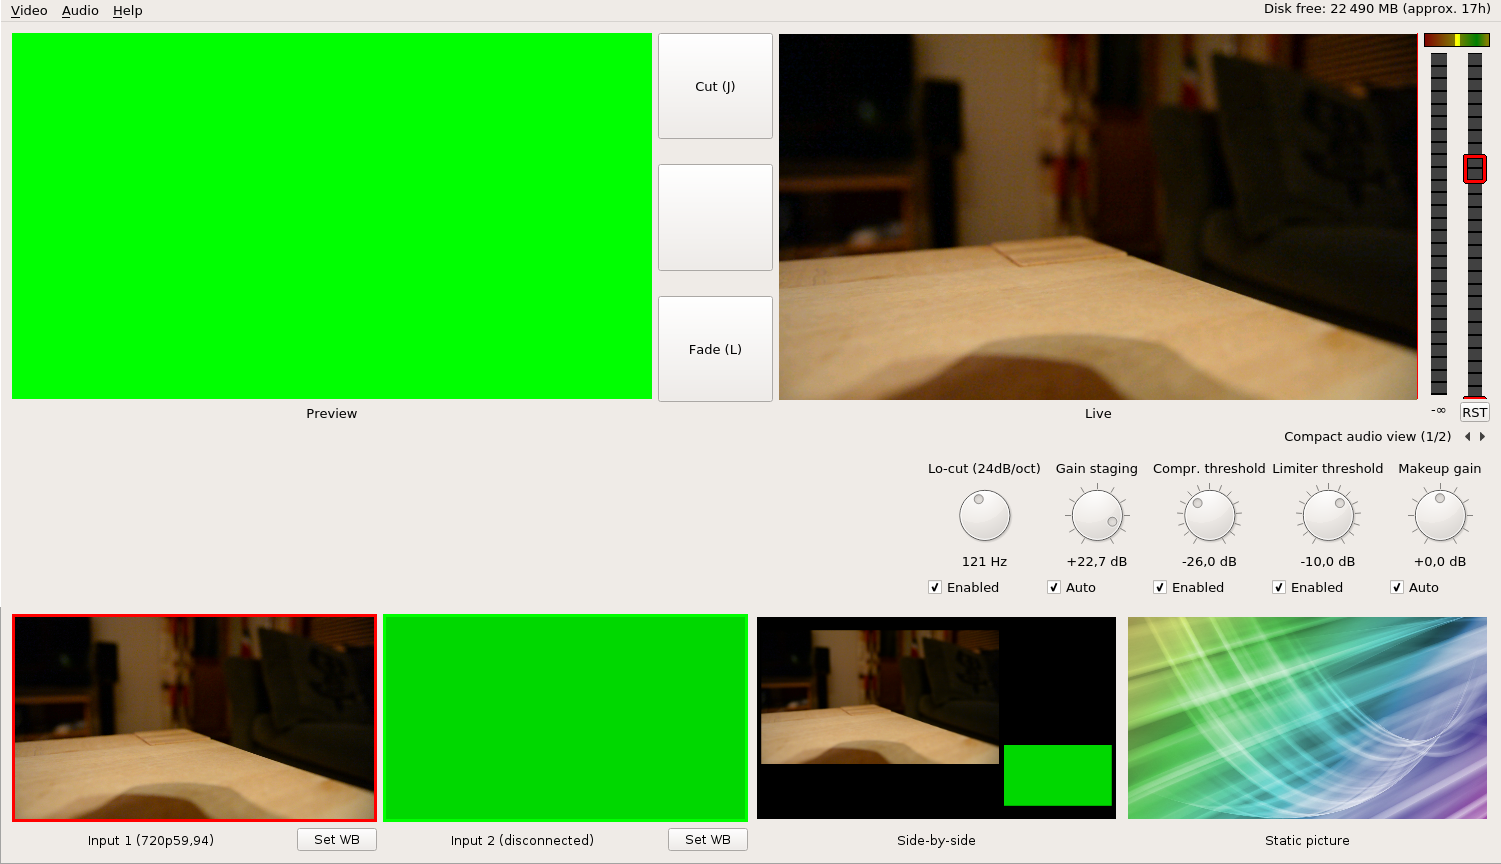
The basic Nageru UI with the default theme looks like this:

First a word about user input: Nageru can be controlled by the mouse or keyboard, but most operators will prefer using both hands on the keyboard. Like on a real mixing console, you use your left hand to select sources for preview (using the 1–9 keys) and the right hand to choose a transition (using J, K or L). In addition, audio can be controlled using a MIDI controller if you want to; see the audio page for more information.
In some situations, like if you’re producing sports, it can be useful to skip the preview step and cut directly to a source. Nageru supports this through quick-cut keys; if enabled, Q, W, E, etc. will have the same effect as pressing 1, 2, 3, etc. and then quickly J (for cut). Since it is easy to press such a key by mistake, this behavior is off by default, and must be enabled explicitly from the Video menu or through the “–quick-cut-keys” option.
Channels
The preview and live displays are the most important part of the UI, and thus take up the bulk of the space. In addition, we have the list of channels and scenes (the side-by-side view and the static image) along the bottom. As you can see, we have only one (rather boring) input connected, and it is live. The other input is disconnected and thus shows only a test color. These correspond to pressing the 1 and 2 keys on the keyboard to activate preview, respectively—or you can left-click on them do achieve the same effect. (Right-clicking will bring up the video card context menu; see below.)
Similarly, we have a side-by-side view; it is composed of a big image of input 1 and a smaller one of input 2. (If you are unhappy which is which, you can switch the two inputs; again, see below.)
Finally, we have a static image. The one included with Nageru is rather bland and generic, but it works as a generic pause image when you don’t really want anything on the screen.
For any given channel, you can see that it is active in the live or preview by looking at its border. If it’s got a red border, as in the leftmost input, it’s live (either on its own, or as part of the side-by-side view). Similarly, if it’s got a green border, as in the second input (you can see it if you look closely; it’s a somewhat lighter shade of green), it will be marked with green. On conflict, red (live) wins, since it is the most important piece of information.
If you have many channels, the default single-row view can make for previews that are somewhat small. If so, you can switch to the video grid display; see The audio views for more information.
Transitions
Whenever you have a different channel pulled up on the preview from on the live display, you will see that the three buttons in the middle offer you various transitions. Selecting any of them (either by the displayed hotkey, or using the mouse) will swap the preview and live inputs, effectively making the preview live. If you use “cut”, this will happen nearly instantly; the two other options, zoom (only available with the side-by-side view) and fade (not available with the side-by-side view) take some time, as you can see in the live view.
A good operator knows to use the right transition at the right time, so that the end result does not distract from the actual message of the video. In particular, too frequent switching between sources will probably be perceived as disturbing.
