The frame analyzer
Maintaining signal integrity throughout a chain can be surprisingly tricky; a number of quite devices, even expensive ones, do not properly pass input pixels unchanged to the output even when no processing is requested. (Commonly, this is due to misunderstandings of how Y’CbCr is to be calculated, or that one end or the other is doing something wrong in the HDMI handshake.) This means that it can be useful to verify that there are no subtle color shifts, and that the entire 0–255 brightness range is both being input and output.
The frame analyzer, available from the video menu, can help with this. It allows you to look at any input, grab a frame (manually or periodically), and then hover over specific pixels to look at their RGB values. When you’re done, close it, and it will stop grabbing frames.
Synthetic tests and common problems
If your input is synthetic, such as from a computer, you may want to use an image such as this one as your test source (right-click and save):
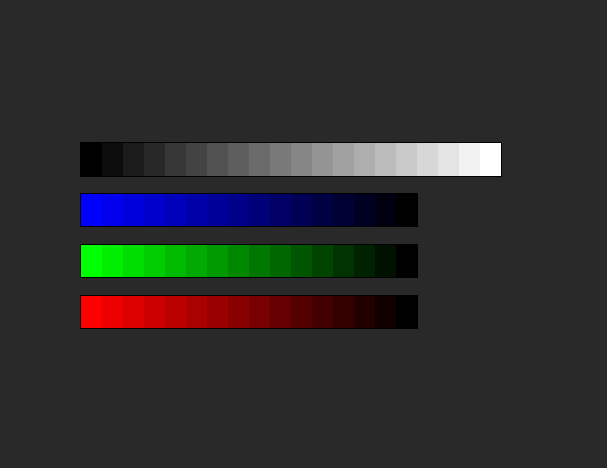
This contains both whites/grays evenly spaced across the entire range (0, 13, 27, 40, 54, 67, 81, 94, 107, 121, 134, 148, 161, 174, 188, 201, 215, 228, 242, 255), and the same for red, green and blue (although with slightly fewer steps: 255, 238, 221, 204, 187, 170, 153, 136, 119, 102, 85, 68, 51, 34, 17, 0). (You can also use any other picture where you know the right pixel values, of course.)
Using the frame analyzer, you can look at each value to see if the input matches the expected values. Being off-by-one (or even occasionally two) is normal due to Y’CbCr rounding errors, but more than this indicates that something in your chain is doing something wrong with the pixel values. Common errors include:
Dark values becoming entirely black (crushed blacks), and similarly with light values becoming entirely white (blown-out highlights). This indicates full-range input being interpreted as limited-range.
Black becoming some non-black dark (e.g. 16) or white becoming some non-white light (e.g. 235). This indicates the opposite problem, i.e., limited-range input being interpreted as full-range. Nageru never defaults to full input range, so this should be rare unless you set full range yourself.
Pure-color inputs no longer being pure-color (e.g. a pure red getting some green and blue). This indicates wrong choice of Y’CbCr coefficients.
Black and white coming through correctly, but midtones being too light or too dark. This indicates a wrong gamma ramp.
Nageru cannot correct arbitrary input problems, but the most common ones can be fixed by selecting a different input interpretation for the card in question. Right-click the input, and you can choose from a variety of different ones. Optionally, check the settings on your sending device to see if they can be corrected, as this is usually a better choice than forcing Nageru to interpret the output in a nonstandard way.
Non-synthetic inputs
If your input is non-synthetic, like a camera, it is harder to spot problems. However, the RGB histogram can sometimes be of help, especially when it comes to spotting range problems. For instance, limited range being wrongly interpreted as full range will look something like the picture on the right, where the lower and upper ranges are unused (although sometimes, it only affects the lower part):
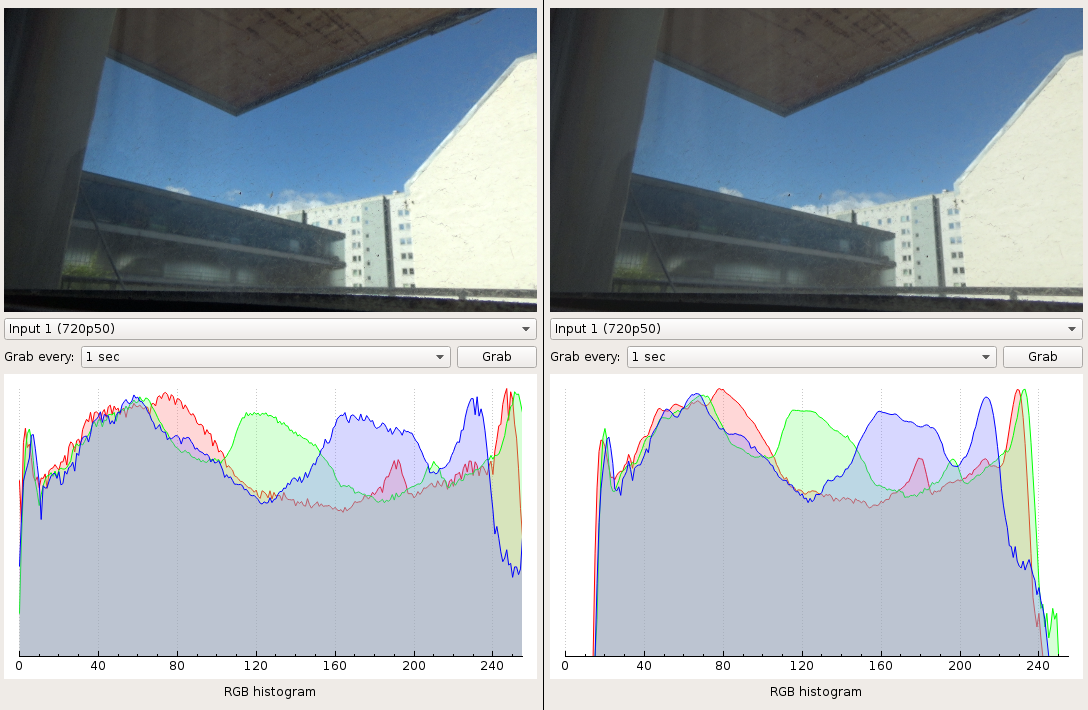
(Note that even side-by-side, it’s not that easy to spot how much duller the image on the right is without looking at the histogram. However, when switching back and forth, for instance between multiple cameras of the same scene, the difference can be quite dramatic.)
Similarly, if your scene is over- or underexposed, you may see values piling up near the one of extremes (0 or 255). If this persists, it usually means you should adjust the exposure on your camera if possible. If the exposure is correctly set, or you see values piling up on both 0 and 255 at the same time, it may either mean that the scene has too much dynamic range for your camera to handle, or that it sends full-range Y’CbCr when it should have been sending limited-range.
Finally, note that the section on measuring HDMI/SDI latency describes another useful trick (looping) you can use to verify correctness, assuming you have a card capable of HDMI/SDI output.